Knowledge Center
February 17, 2025
Endoscope Manual Cleaning & Point-of-Use Treatment Guide
HOW ARE ENDOSCOPES CLEANED?
Manual cleaning is arguably the most important step when processing an endoscope. If residual soils or bioburden remain on the device, high-level disinfection (HLD) or liquid chemical sterilization (LCS) may not be achieved. Blood, complex carbohydrates, and proteins could flow into small lumens, grooves, or other difficult-to-clean locations on these complex, flexible, and semi-rigid devices. It is imperative residual soils be properly removed so the endoscope can be high-level disinfected or liquid chemically sterilized and deemed safe for the next patient.
In this article, we will cover the following topics:
- Endoscope Cleaning Standards and Guidelines
- Point-of-Use Treatment of Endoscopes
- Manual Leak Testing Procedures for Endoscopes
- How Endoscopes Are Manually Cleaned
- Common Mistakes Made During Manual Cleaning
To learn more about all the steps required for processing endoscopes, click here
ENDOSCOPE CLEANING STANDARDS AND GUIDELINES
Because cleaning of endoscopes is so important, many standards and guidelines have been developed to help guide facilities on best practices:
- ANSI/AAMI ST91 Flexible and semi-rigid endoscope processing in healthcare facilities is one of the standards for endoscope processing. The standard emphasizes that cleaning is critically important and guides the necessary workflow and steps.
- The Association of periOperative Registered Nurses (AORN) provides guidance in its document "The Guideline for Processing Flexible Endoscopes." AORN emphasizes the importance of complex processes for effectively cleaning endoscopes for proper sterilization or HLD.
- The Society of Gastroenterology Nurses and Associates (SGNA), in its document "Standards of Infection Prevention in Reprocessing Flexible Gastrointestinal Endoscopes," provides details on endoscope reprocessing and cleaning protocols, including point-of-use and manual cleaning. In this document, SGNA states: "[Manual Cleaning] is the most critical step in removing the microbial burden from an endoscope. It requires focused and deliberate attention."
Even more important than published standards and guidelines, reprocessing personnel must have access to and be familiar with the validated manufacturer's Instructions for Use (IFUs) of each endoscope they are reprocessing. These IFUs provide validated step-by-step instructions for cleaning specific devices.
POINT-OF-USE TREATMENT OF ENDOSCOPES

Cleaning starts before the endoscope reaches the device processing area. Immediately after the procedure, a technician will begin the point-of-use treatment process at bedside with products like INTERCEPT™ Foam or the Revital-Ox™ Bedside Complete Pre-Cleaning Kit.
Point-of-use treatment, or bedside cleaning, helps remove debris and organic materials from the devices immediately following the procedure. Timing is important because the longer the bioburden remains on the device, the more it dries and becomes difficult to remove during manual cleaning.
Along with a bedside cleaning kit, using a product such as the PRE-KLENZ™ Soak Shield can help initiate pretreatment at the bedside and protect the device tip against damage during transport.
MANUAL LEAK TESTING PROCEDURES FOR ENDOSCOPES
Before manual cleaning can begin, endoscopes must undergo manual leak testing in accordance with the device manufacturer's IFU. Endoscopes are complex, delicate devices, and some components cannot be exposed to fluids. Leak testing helps check for cracks, tears, or leaks that could allow for fluid invasion and damage to sensitive components like video chips or fiberoptics.
Leak testing after each procedure helps ensure the device is in optimal working order and typically includes the following steps:
- Connecting the pressure tester and water cap, if applicable
- Depending on the endoscope IFU, dry leak testing may be required first. This process pressurizes the device, to identify any pinholes so fluid doesn't infiltrate the scope.
- Submerge the flexible section of the scope and observe for air bubbles
- Submerge the entire endoscope and observe for air bubbles
While following the device manufacturer's IFU for leak testing, if no leaks have been detected, technicians can begin the normal cleaning process.
MANUAL CLEANING OF ENDOSCOPES
The device manufacturer's IFU dictates the correct cleaning procedure. Manually cleaning endoscopes can sometimes involve more than 100 individual steps, including attaching various connectors and flushing for a certain amount of time, manipulating the devices, and more.

Generally, when cleaning a flexible endoscope, the following major steps are followed, each typically requiring many subsequent steps, detailed in the IFU.
- Fill a three-basin sink using clean water and a low-foaming, pH-neutral detergent formulated for endoscopes. Typically, the first bay is only water and is used for leak testing; the second basin is used for cleaning, and the third basin is used for rinsing.
- Immerse the endoscope in the cleaning solution after ensuring any required caps are secure
- Remove debris from the exterior of the endoscope by wiping the instrument with an endoscope sponge while submerged. The endoscope's internal and external surfaces and removable parts must be thoroughly cleaned.
- Clean all parts, including any openings, inside and under the suction valve, air/water valve, and biopsy port. A correctly sized endoscope channel brush should be run through the channels of the device.
- After each part is cleaned, brushes should be cleaned using the endoscope cleaning solution to remove any visible debris
- Technicians should continue brushing until there is no visible debris
- After brushing, technicians typically attach device-specific cleaning adapters for suction, biopsy, and air and water channels. Some endoscopes also require specific cleaning adapters for channels such as the elevator or auxiliary channel.
- Once connected, technicians flush all channels with a cleaning solution to remove debris, then soak the endoscope for a specified period of time
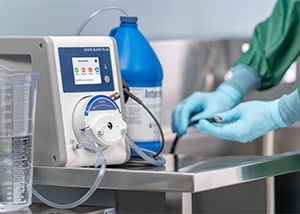
While manual cleaning requires many steps, this process is greatly simplified using SCOPE BUDDY™ PLUS Endoscope Flushing Aid, which assists in the cleaning process. An automated pump provides consistent aspiration and hands-free endoscope flushing instead of manually aspirating and syringing the channels. The system can also be programmed to provide a timer for manual brushing to ensure technicians brush for the time specified in the IFU.
Chemistries Used for Manual Cleaning of Endoscopes
Manual cleaning of endoscopes relies heavily on using specific chemistries to ensure thorough removal of organic material and contaminants. Two primary types of cleaning agents are commonly used: enzymatic cleaners and neutral detergents, often combined with surfactants.

Enzymatic Cleaners
These are specially formulated to break down organic materials such as proteins, fats, and carbohydrates. Enzymatic cleaners contain enzymes that accelerate the breakdown of these substances, making them easier to remove. Enzymatic cleaners are particularly effective in dissolving blood, mucus, and other bodily fluids that can adhere to the surfaces and internal channels of endoscopes. By breaking down these materials, enzymatic cleaners help ensure that subsequent cleaning steps are more effective.
Products like Revital-Ox Enzymatic Detergents are designed to address specific cleaning challenges, such as removing simethicone, a substance used in some medical procedures that can be particularly difficult to clean.
Learn more about STERIS Enzymatic Cleaners
Neutral Detergents with Surfactants
Neutral detergents, such as INTERCEPT™ Detergent, are non-corrosive and safe for use on delicate endoscope materials. When combined with surfactants, detergents become even more effective. Surfactants reduce the surface tension between water and the endoscope surfaces, allowing the cleaning solution to penetrate and lift soils more efficiently. This combination helps remove a wide range of contaminants without damaging the endoscope. The addition of surfactants is crucial as it enhances the cleaning action, ensuring that soils are not only removed but also prevented from re-deposition on the endoscope.
Endoscope Cleaning Brushes and Sponges
Brushes and sponges are vital tools for the manual cleaning of endoscopes due to their ability to:

- Remove Debris: Brushes clean intricate channels and surfaces, removing organic material like blood and tissue. Sponges wipe exterior surfaces to ensure all visible debris is eliminated.
- Prevent Biofilm Formation: Regular use of correctly sized brushes helps prevent biofilms, which are layers of bacteria that can adhere to endoscope surfaces and shield pathogens from disinfectants
- Maintain Functionality: Proper cleaning keeps all components, including channels and valves, free of obstructions, ensuring the endoscope's functionality and longevity

Enzymatic sponges are designed to remove soils and thoroughly clean crevasses of endoscopes. These endoscope cleaning sponges are particularly important because they:
- Enhance Cleaning Power: Impregnated with enzymes, they break down proteins, fats, and carbohydrates, making it easier to remove stubborn debris.
- Supports Compatibility: Safe for delicate endoscope surfaces. They effectively dislodge contaminants without causing damage.
ENDOSCOPE CLEANING SINKS
The sink used for manual cleaning is important as well. Some facilities may use a simple utility sink, but this often isn't sufficient to properly reprocess endoscopes. ANSI/AAMI ST91 section 4.2.2 has specific recommendations about sink needs, including size and workflow arrangement.
In the decontamination area, it is ideal to have three bay sinks per the standard: one for leak testing, another for manual cleaning, and a third for critical water rinsing. However, facilities may use two sinks or one sink with two separate basins. If a two-sink workflow is used, manual leak testing may be performed in one bay, and once completed, the technician typically adds detergent and manually cleans in the same bay, while the last sink is typically used for rinsing.
When choosing a sink, key considerations include size and location, flushing accessories, and ergonomics to ensure effective cleaning and employee safety. The sink size is crucial as tightly coiling the endoscope can damage components such as image or light bundles, internal channels, tubes, and angulation wires. Ergonomic, height-adjustable sinks help personnel avoid bending over to reach far into sink basins during cleaning tasks, reducing the risk of back injury or strain.
TOP 10 MISTAKES DURING MANUAL CLEANING
Avoiding common mistakes during manual cleaning of endoscopes is crucial for ensuring effective reprocessing and maintaining patient safety. Common mistakes to watch out for:
- Skipping Point-of-Use Treatment: Failing to perform immediate cleaning at the point-of-use can allow organic material to dry and become more difficult to remove later
- Inadequate Manual Leak Testing: Not performing leak testing before cleaning can lead to undetected damage, allowing fluids to infiltrate and damage the endoscope
- Improper Use of Brushes and Sponges: Using the wrong size or type of brush or not brushing all channels thoroughly can leave behind debris
- Delayed Reprocessing: If cleaning is not started within 1 hour after the procedure, extended cleaning according to the IFU likely must take place, which adds steps that lengthen the entire process
- Insufficient Rinsing: Failing to thoroughly rinse the endoscope after cleaning can leave detergent residues, interfering with the next reprocessing steps
- Improper Handling and Storage: Mishandling endoscopes during cleaning, transport, or storage may lead to inadvertent damage. Tightly coiling endoscopes in a small sink can damage internal components. Endoscope tip protectors can help protect delicate lenses.
- Neglecting Visual Inspection: Not performing a thorough visual inspection can result in missed debris or damage, compromising the effectiveness of subsequent disinfection or sterilization
- Ignoring Ergonomics: Not using height-adjustable sinks or proper ergonomic practices can lead to staff fatigue and injury, which can affect the quality of cleaning
- Inadequate Documentation: Failing to document the cleaning process can lead to gaps in compliance, making it difficult to track and improve reprocessing practices
- Overlooking Manufacturer's Instructions: Not following the manufacturer's IFUs can result in improper cleaning and potential damage to the endoscope, which can lead to improper disinfection or sterilization, which may impact patient outcomes
By being aware of these common mistakes and taking steps to avoid them, healthcare professionals can ensure that endoscopes are properly cleaned and safe for patient use.
Learn More on STERIS' Endoscope Repair Services
VALIDATED AUTOMATED CLEANING OF ENDOSCOPES

Since manual cleaning of endoscopes is a labor-intensive process with many steps, human error can come into play and potentially cause issues with effective reprocessing. Due to their complexity, an automated cleaning process that is repeatable would be ideal, but most automated endoscope reprocessors (AERs) do not include a validated cleaning process.
The enspire™ 3000 Series Cleaning and Liquid Chemical Sterilant Processing System is intended to effectively provide pressure monitoring, liquid chemical sterilization, cleaning, rinsing, and air purging of validated immersible, reusable, semi-critical, heat-sensitive medical devices such as flexible endoscopes and their accessories. Depending on your facility's policies and procedures, the validated cleaning process can replace manual cleaning for endoscopes other than duodenoscopes. After an automated cleaning process, liquid chemical sterilization eliminates all viable microbial life, including bacterial spores. This innovative AER provides automated cleaning and LCS in 38 minutes, from start to finish.
THE IMPORTANCE OF CLEANING FLEXIBLE ENDOSCOPES
Improving patient safety and ensuring that devices are safe for use on patients is everyone's responsibility. The cleaning process starts in the procedure room with point-of-use treatment to help ensure cleaning can be done efficiently in the processing area. Due to its importance, endoscope reprocessing cannot be taken lightly. Hospital leaders who invest in the process with education and innovations in automated cleaning tools can help ensure successful patient outcomes and a healthy bottom line.
Explore STERIS Point-of-Use Treatment and Manual Cleaning Products
- Learn about the enspire™ 3000 Series Cleaning and Liquid Chemical Sterilant Processing System - The first and only AER with LCS and a validated cleaning claim* for processing reusable, heat-sensitive, semi-critical medical devices and their accessories.
*Cleaning claim does not apply to duodenoscopes
Related Resources


| FOLLOW US | |
|---|---|
|
|
|
|
|
|
|
|
|
|
|
|